Ants’ new home gets blinged up. They can thank us later…
Jordan, Pete and I managed to finish the ant farm! It is now home to over 1000 red harvester ants. Unlike old ant farms that use dirt or sand, ours uses a gel that was originally developed by NASA for ant experiments in space. We are still looking into ways to make the gel ourselves, but in the mean time we found a website that manufactures the stuff,antgel.com. The gel contains all the food and water that the ants will need to survive. It even helps prevent them from developing infections. The ants should have everything they need to reach the end of their life cycle, which should be in about 6 months.
Right now, all the ants in our farm are workers, we don’t have a queen yet. We have been discussing ways in which we could obtain a queen. But it will probably be awhile before we decided to go through with it, since we would have to take extra precautions to ensure that a queen wouldn’t escape.
We are trying to get a camera up and running so we can make some time lapse videos of the ants as they work. In the meantime, stop by open house and check them out for yourself!
Our original plans. The actual farm size is 16.0″x26.9″x2.25″. We went with box dimensions that were in proportion to the golden ratio for ascetics.
The ants are settling in and have begun making tunnels.
The spinach I was growing managed to complete most of its life cycle. Around a week after my last post I added the nutrient solution to the plants’ water, thats when they really started to take off. I had one hiccup during the test run where I didn’t properly sent the flow rate of one the IV bags and half the nutrient solution was lost. If I was a little less… well lazy that day… I would have replaced it , but I didn’t. So the IV bag ran out of nutrient solution and some of the plants died before they reached maturity. Luckily, the rest of the plants managed to reach their flowering stage. So overall, the IV bags were incredible useful. Thanks Jordan for the idea!
Seeing how classes are starting to pick up, I figure now is a good time to stop the experiment and take some time to look over my notes. But, I hope to have another prototype built by the end of next month. ( Btw, sorry for not being around open house lately to discuss hydroponics, I have a night class that meets at the same time this semester).
Speaking of which, a friend of mine who frequently stops by open house, Ian, has taken the plans of the hydroponic garden I built two years ago and built one of his own at home. Suffice to say, the plants have grown wild and are firmly in control of his bedroom. Given how successful his garden has been, he’s inspired me to dust of my old plans and think about building another, LARGER, set up for just for show (the hydro setup currently at Hive is mainly for experimentation). That’s all for now…
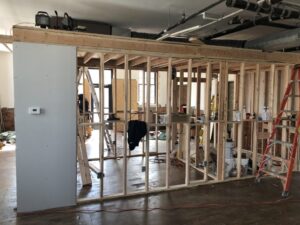
Hive is getting it’s own hive (ants). We are building a giant ant farm out of sheets of 3/8″ acrylic with silicone caulk between and some steel bolts for holding everything together (and for that classic steampunk look). Rich and Pete and I got the thing together and Brendan did the boss trapezoid cut on top.
First test for water-tightness revealed one minor flaw which will be fixed this week.
We’re going all-in.Water-testing in a clean trash can. Pete says: “It’s like it was made for the trash!!”
The critical shortage of organ donors in our healthcare system is the reason I’m registered to be an organ donor and motivates my research to develop suitable replacement technologies in the field of regenerative medicine. Video below! It was an honor and privilege to take part in TEDxYouth@SanDiego, which brought 400 San Diego high school students together to interact and think deeply about the future. It was incredible to speak with so many students who are truly the Architects of the Future.
From TEDxYouth@SanDiego:
Using simple yet illustrative analogies to help non-scientists understand his scientific discovery process, Biomedical Researcher Jordan Miller explains to his young audience how he developed vascular structures through 3-D printing. This exciting research is an important complement to advances medical researchers have made in 3-D printing bioidentical human tissue and organs in the lab. it’s a remarkable prospect for the future of organ transplantation.
Deriving inspiration from a cross section of bread and the sugar structure arcing over his dessert, Dr. Miller describes how he combined his background in regenerative medicine, a passion for the maker movement and reliance on worldwide open sourcing to develop viable 3-D printed vascular systems that he demonstrates actually transporting blood.
Jordan Miller, Ph.D. is a post-doctoral researcher in the Tissue Microfabrication Laboratory at the University of Pennsylvania. Involved with the 3-D maker community since its infancy, Jordan uses a 3-D printer in his work in biomedical research and regenerative medicine and credits open-source collaboration and the maker movement as important contributors to the success of his research.
The Creator’s Project released a new video, and our sugar printing, gelation, and blood pumping was featured in it! Trackback is to 3Ders.org The project goal is to unify artists and technologists and this video is focused on 3D Printing:
And I just got done with a talk at ScienceOnTap Philly! It was a truly excellent night! Special thanks to the Organizers and also the Hivers who came out or emailed in their support! You peeps are the best.
Here are some pics via the Twittersphere. Thanks to the photographers for posting!
New hydroponic setup… Let’s just say my carpentry skills are a little rusty.
So here is a quick update on my hydroponics setup at Hive76. In my previous post I uploaded a video on a hydroponic garden I built in my basement two years ago. My goal was to build the setup with as little moving parts as possible to ensure the garden required little maintenance. With the hydroponic garden I am building at Hive76 I decided to keep to the spirit of simplicity but a completely different approach with it.
With my latest versionI am using medical grade IV bags to store the water above the plants. Then by attaching a mechanism to the IV bags known as a ‘flow controller’, gravity pulls the water from the bags to the plants below at a consistent rate. The rate at which water flows through that controller be anywhere from 5 to 250 ml / hr.
The IV bags and flow controllers are great because they are very inexpensive (one IV bag and flow controller cost me a few dollars from medtecmedical.com). Plus they can potentially be reused since they are being used on plants and not humans if you are careful to prevent contamination. But possible the most useful thing about using IV bags is that they require no energy to operate, which further reduces costs.
IV bags filled with water.
To evenly distribute the water that is supplied by the IV bags to the plants, I put the plants within a medium of rockwool cubes that are about 1 cubic centimeter in size. The rockwool essentially acts as a sponge that takes the water that is supplied by the IV drip and evenly distributes it to all the plants within the container.
I’m testing my current hydroponic setup on spinach seeds at the moment. The plants are still in their infancy so I have not added nutrients to their water supply yet but I plan to do so in about a week(adding too high a concentration of nutrients to young plants can damage their roots). My short term goal is to monitor the spinach in my hydroponic setup through its entire life cycle, taking general notes along the way. After the plants have finished their life cycle I want to take some time to build a second prototype and post its plans on Hive’s webpage. Hopefully by that point, the system will be a useful platform for scientific experimentation. Then the real fun can begin!!!
Gravity flow controller: controls the flow rate of liquid from the IV bags.Germinating seed in rockwool and temperature probe.
My current project at Hive76 is working on indoor hydroponic systems. The project comes from an interest in plants that I picked up from tending to my mother’s garden as a child. My family was fortunate to have enough land for a sizable garden when I was growing up, but now that I live near center city Philadelphia, good plots of land can be difficult to find. So I naturally turned to hydroponics because it is not limited by land area the same way that traditional farming is.
Hydroponics has the potential to revolutionize farming as we know it because it allows for plants to be grown in highly controlled environments. This means that the light, water, and nutrients that plants need to thrive can be optimized to promote rapid growth while reducing waste and pollution. Also, as mentioned before, hydroponics systems be built vertically instead of just horizontally, which is a huge benefit in dense urban environments like Philadelphia.
Even with all the potential benefits of hydroponics, it has yet to become a competitor with traditional farming in the open market. There are many reasons for this, one reason is that the cost of lighting in an indoor hydroponic system will always cost more than traditional farming, which gets its light for free from the sun. (Luckily the cost of lighting is dropping all the time with advancements in florescent bulbs and LED technology.) Another reason is that there is a lot of politics around farming that doesn’t favor the development of hydroponics.
Despite all the this, hydroponics is still holds a lot of potential to revolutionize agriculture. It is also a great way to learn about plant science. I’m particularly interested in using hydroponics to develop a low cost platform for amateur science experiments. The hope is that by empowering people with the right tools , the next breakthrough in agriculture might come from a high-school student’s science fair project!
The hydroponic system that I am building at Hive76 is very much in the early stages. In the meantime, I wanted to post a video on a previous hydroponic system that I built in my basement 2 years ago. It works by flooding the roots of the plants with water supplied by a reservoir below.
This year I wanted to do something a little different for Christmas gifts. Instead of just getting people electronics or video games or clothes, I wanted to give something that encouraged creativity and making. A lot of people never even think to try to make things on their own, so maybe a little hobby-style gift will give them a taste and spark an interest.
Texas Instruments MSP430 LaunchPad.
To that end, I did two things. First, I bought ten MSP430 LaunchPads. These things are really inexpensive, so they make great stocking-stuffers. If you don’t know what the MSP430 is already (really, we talk about it constantly, where have you been), it’s a 16-bit microcontroller with really low-power consumption needs. They run on 1.8 to 3.6v power supplies at up to 16MHz, making them quite a powerful little beast for only $4.30, which includes the chip programmer. If you were to buy the chips alone, they cost about $0.50 each, with a few different serial communication protocols built in, and requiring only a small selection of external parts (2 resistors and 2 caps if you want to do it right, 1 resistor if you’re living dangerously, and face it, at $0.50, you can afford to live dangerously). It’s something of a long-term project plan of mine to buy 100 of these and try to build a small, physical neural network computer.
A lot of people have shied away from the MSP430 because the Code Composer Studio software–based on the professional-grade Eclipse development environment–is very difficult to use in comparison to the Processing-based software typically used to program Arduinos. But luckily, someone has taken the Arduino cue and created Energia, a Processing-based editor for use with TI’s LaunchPad line of MCUs! If you’re experienced with Arduino, using Energia is a snap, and if you’re not experienced at all, it’s really not that big of a learning curve.
Making the putty is really easy. I pooled all 6 eggs of putty together in a non-stick pan. On very low heat, I warmed up the putty until it was just too hot to handle with my bare hands. If it starts to become the consistency of chewing gum and sticks to the pan, don’t worry, it will unstick when it cools down. Don’t heat it further than that though, it will start to smoke and burn. Wearing rubber gloves to give me just enough insulation from the heat and to keep my hands from getting stained black, it’s just a matter of working a large, heaping tablespoon-full of the black powder into the putty. You will need to work the putty like taffy, stretching it and folding it to blend the powder evenly into it. Once the powder is sufficiently kneaded in to the putty, it will not stain anything, so keep testing it on the back of your rubber glove to see if it leaves any marks. I then cut the putty into 6 equal chunks and shoved them back in their eggs. It took 10 minutes total. I thought about taking some photos of the process to show it off, but really, it could not be simpler.
I’m hoping these gifts will be completely unexpected and will inspire people to try something they never would have considered on their own. The MSP430s are just a really easy, cheap, fun way to get into programming, and the magnetic Silly Putty is a great example of something you can’t buy as a product that is also extremely easy to make.
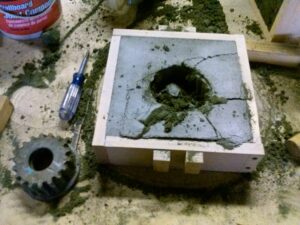
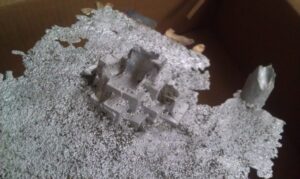
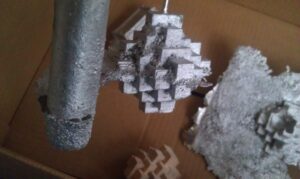
Lately, a few members have been discussing the use of 3D printed parts in use with metal casting techniques to create some stronger, lighter and more durable parts. As all good hackerspace conversations do, we immediately decided to go with the most painful and difficult solution: Metal Casting. Luckily for us the very next day, we got an e-mail that a local group, Philadelphia Sculpture Gym, that they intended on hosting an aluminium greensand casting class. A perfect opportunity to learn some metal casting techniques, even if not totally applicable to what we wanted to ultimately end up casting. Andrew S., and myself both signed up along with a few friends of Hive76.
About 30 minutes into making our own greensand molds, we realized that this was going to be a difficult process, and immediately destroyed several hours of work trying to get a good crisp mold for our first pour.
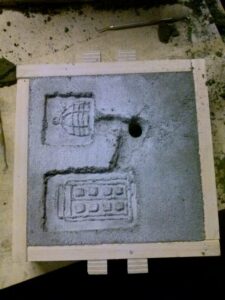
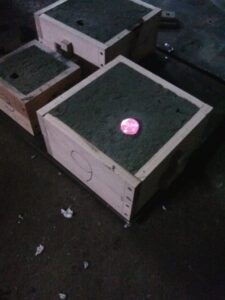
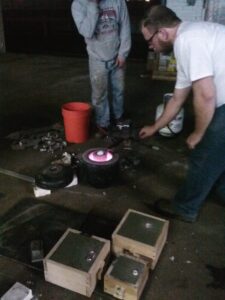
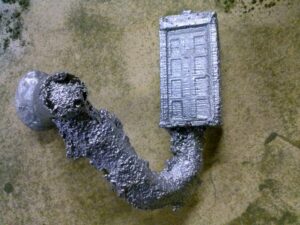
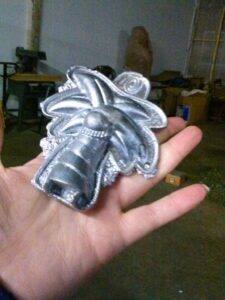
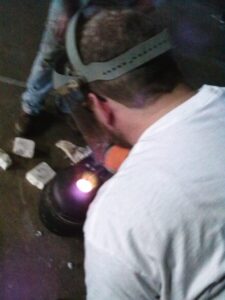
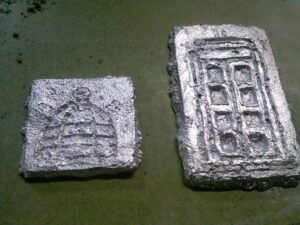
Several hours into our class, we managed to finally get a good solid mold of a 3D printed TARDIS. We hopped in line and got a pretty good looking cast. Andrew also attempted the TARDIS with some success. He also managed to get some good casts of a wooden puzzle, including one that blew out. However, due to our earlier troubles, we decided to hedge our bets and get one more good pour out of the class before we would start wrapping up. While waiting to pour ours, I was being shown how to work the furnace by Gus, and ended up melting down plenty of scrap and helping others make their pours which was a lot of fun to be working with. The furnace was operating at about 1300 Celsius, and moving around molten metal at that temperature can be quite a thrill. We plan on working with Gus and Darla at Philadelphia Sculpture Gym on some other types of casting techniques, especially as they apply to our 3D printing. We look forward to working with them in the future, and hope you all consider taking their next Greensand class in January.