Hive’s Holiday Hackshops – Dec. 15th

Okay, so the boys and girls haven’t been nice.  However, that shouldn’t exclude you from having some fun holiday hacking.  Join us this Sunday at Hive  for either of these workshops:

3D Printed Ornaments

1:00 – 5:00 PM

Want to witness 3D printing live?  Join David Morfin and Leslie Birch for this festive workshop where you can choose from a variety of ornaments to print (including an epic Star Wars snowflake).  Then, hack it here with a battery and LED to get it glowing.  Tour our space and enjoy holiday snacks at the same time!

Price:  $10 Collected at door

Get Your Tickets Here

Remote Controlled Car Hack

1:00 – 5:00 PM

Learn how to turn almost any toy RC vehicle into a simple robot.  Because most RC toy vehicles are incredibly similar, you can easily learn how to hack them.  We’ll teach you some of the theory behind these circuits and then we’ll help you put it into practice.  A cut here, a jump there, a microcontroller and a little code and — voila! — you will be the proud creator/owner of a small-but-evil robot, just in time for XMas.

We will have microcontroller kits and cars available if you need them, or you are free to bring your own.  If you bring your own controller, we would recommend that you bring an Arduino or an MSP430 Launchpad.   If you bring your own vehicle, just make sure is has a TX2/RX2 chip (as a suggestion, the Thunder Tumbler is one of my favorite bot platforms).

Prices: Based on car and will be collected at door


Base Price — Donation for materials etc. in whatever amount you feel is appropriate

Large Car — $20

Medium Car — $15

Small Car — $5

Micro-controller kit — $5 (MSP430 Launchpad)


T.E.R.A. Incognita at The Hacktory

Our friends over at The Hacktory (Repurposing Technology, Making Art) are running a Kickstarter to raise matching funds for an excellent project to unite artists with the latest technology to empower new designs. From their Kickstarter page:

Electronics and digital technology can infuse works of art with an element of magic. At The Hacktory we have literally put this magic in people’s hands, through classes and large public events. We want to do more though. We want to make our classes available to artists. We’ve found that they are usually the most excited to take our classes and play with technology, but usually the least able to pay for our classes.

The Hacktory is creating a program called T.E.R.A. Incognita: Tech Education and Residency for Artists. Our goal is to support artists who want to create new work and experiment with technology such as cameras, projectors, sensors, robots, software and circuits. The name “T.E.R.A Incognita” is part acronym, part vision for the program. We want to give these artists an opportunity to learn and explore at the edges of technology and art, literally in unchartered territory, to create new experiences and new possibilities with code, hardware and creative expression.

The Kickstarter ends on Monday, so go check it out and consider making a pledge! Some great rewards are being offered too.

Real–Life Redstone Lamp Replica Controlled by a Raspberry Pi

Early in my gameplay in Minecraft I began making redstone contraptions. For those that don’t know Minecraft, you can use resources in the game to make analog electronics. People have extended this feature to build entire working computers all in redstone logic in Minecraft.

Redstone lamp (activated)

I only used redstone to make traps and novel machines, but the strong connection between redstone and electronics led me to imagine extending these machines out into the real world. I figured the easiest thing to make was the Redstone Lamp, pictured to the right. The redstone lamp is a block that will provide light when powered. My real life replica redstone lamp does the same thing. It lights up when a redstone lamp ingame is lit up. Here is a video of how it works:

I’ll describe how I got to a working replica in a few stages.

Software

I am not the best getting started with software projects, so I enlisted the help of Vince who was hanging out a bunch at Hive76. We made a quick prototype with a python Minecraft client called pyCraft, an Arduino, and transistor, and a papercraft redstone lamp. You can see that first success here.

While I worked on the physical stuff, Vince moved away and Kyle Yankanich stepped in to help me finalize some stuff. PyCraft connects to any server as a simple chat client, in our case as the user LAMPBOT. Kyle wrote a plugin for pyCraft that listens for a whisper of “on” or “off” and sets pin 16 on the Raspberry Pi’s GPIO high or low respectively. You can download my fork of pyCraft here with Kyle’s plugin and my shell script to start the client. I set my home server to Offline mode so that I wouldn’t need to purchase another Minecraft account.

Hardware

Redstone lamp replica

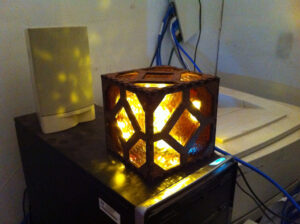
For the replica, I did my best to turn pixels into straight lines. I designed a laser-cuttable box in six parts with finger joints on the edges. I used 16 finger joints because the a block is 16 pixels wide. The material is MDF with a zebra wood veneer laminated on top. I laser cut six sides and glued all but one together. I acquired some amber cathedral glass from Warner Stained Glass, cut, and glued it in place with silicone adhesive. The RPi is attached to a MDF board sitting diagonally in the cube. The LEDs were torn from inside a failbot and glued around the RPi to light up the inside as much as possible.

In order to turn the LEDs on and off, we use the signal from the RPi GPIO to control an NPN transistor and turn the lights on and off. There is a fritzing wiring diagram of the electronics here. On the NPN transistor, the Collector is the negative lead from the LEDs, the Base is connected to a 100KΩ resistor and then pin 16, and the Emitter goes to the ground on the LED power supply.

There’s no room for a power regulator, so there are two power sources and ethernet running through a hole in the back.

Ingame Stuff

Ingame redstone

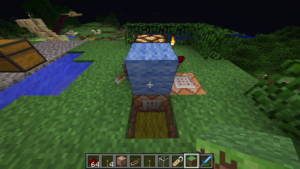
To trigger the lamp, command blocks are used ingame as you can see to the left. When a lever is thrown powering a specific redstone lamp, we also power a command block that sends the server command:
/tell LAMPBOT on
We also send the inverted signal to a different command block that outputs:
/tell LAMPBOT off
This can be used on any server with no mods. You would need a Minecraft account for the lamp so you don’t expose your server to cracked clients. The server this was designed for runs Minecraft 1.6.4 now, but in 1.7.2 the /testforblock command and a clock could also trigger the lamp.

I really hope you take what we have done here and continue to connect your Minecraft creations to the real world. Enjoy!

Civic infrastructure hacking: laser-controlled streetlight.

Three more things in my house require a remote control now, and one of them is the streetlight in front of my house. Ever since I heard about a hacked streetlight at the Guerrilla Drive in for Back to the Future in 2009, I have been turning off the streetlight on Darien Street by carefully aiming a laser dot at the light sensor on top of the streetlight. The light sensors on most streetlights face west to catch the last photons from the fading sunset before illuminating for the night—and this one faces right into the third floor of my house. It is very important to me to be able to choose to sit in the cozy dark, save my city some money, and not contribute to light pollution for a minute.
Just recently I revamped the process with a new, permanent laser and remote control system. Here it is in action:
I’ll show you how …
Continue reading “Civic infrastructure hacking: laser-controlled streetlight.”

Let’s make a tablet!

UPDATE: I’ve since returned this unit to the vendor. It’s really bad. The native screen resolution is abysmally small, plus is a weird value such that none of my OSes could handle it. The device did its own down-sampling, but did a terrible job of it. Also, the touch sensing was almost completely broken.

Apparently, there is a thing with these small displays where they advertise them as “1080p input!”, meaning they will make attempts to downsample a 1080p data stream to whatever their native resolution is. The resolution on this one was actually 800×480. I couldn’t get Linux Mint or Windows 7 to display on it at the native resolution. It would take other resolutions and do some pretty awful down-sampling, but it always managed to cut off the edges enough that the taskbar and window title bar were never visible.

The touch feature was also almost completely broken, as well. I tried it on Linux Mint first, trying a variety of different drivers available for the device. All Linux drivers from this manufacturer were compiled from source. I tried the one copy named “Linux” on the included CD and tried two copies downloaded from their website for “Ubuntu 6.06” and “Debian K26”. Of course, if we’re compiling from source, why would we need separate sets of source code? But anyway, at first it didn’t seem to work, so I thought I just failed to install the drivers, but things that happened later changed my mind. Windows 7 found a HID driver for it, identified it correctly, but it still didn’t work correctly. I also tried to download the latest driver off of their website, but their ZIP file is corrupted and won’t open with either the Windows Compressed Files utility or 7-Zip.

Moving on with the driver found for me by Microsoft, I now tried using the touch screen as the primary display, disabled my main monitor, unplugged my mouse, and restarted the computer, thinking it might help stabilizing the situation. I finally realized that I had seen the same behavior on Linux, I just hadn’t yet figured out what was going on because Mint wasn’t showing a cursor for the touch events and Windows did. It had the axises completely swapped, and also reversed, so dragging down the screen moved the cursor left. Also, it had no concept of a continuous drag event. It would sometimes drag, sometimes spawn a series of rapid clicks instead.

In other words: complete, unworkable garbage.

I’d be interested to hear from people if they have a recommendation for a simple touch screen. I think I’d like at least 15″ size, and I’m a little concerned about the popularity of multi-point capacitive sensing over the older-style, one-point-only resistive sensing. Yes, the capacitive is more precise, but the resistive doesn’t freak out if it gets just a little damp.


So here is my latest toy. It is the Lilliput 7″ SKD Open Frame Touch Screen VGA Monitor with HDMI, DVI Input (note: this is not a referral link). You can see more pictures of the device on my Tumblr page. I’m thinking of either building my own tablet computer or a sort of remote control system. It’ll end up being a little chunky, but I don’t mind.

The natural DIY platform for such a project is the RaspberryPi. I’m thinking I want to take the stock Raspbian distro and hack together my own window manager for it to suit the small, restricted dimensions of the system. I’d like something halfway between a CLI interface with its infinite possibility and a GUI interface with its emphasis on geometric arrangement.

Anywah, I’ll keep everyone posted with my progress.

1 Pixel video game; component-driven design

It didn’t take me and Robert long to find an RGB LED pushbutton. I composed a short part number using the NKK data sheet and found a KP0215ASBKG03RGB-2SJB. I made a simple perf board shield with the proper resistors for my Arduino Mega 1280 and re-learned Arduino to light it up.

Gaussian curves from https://www.desmos.com/calculator/zkmpvehya3

Gaussian curves from https://www.desmos.com/calculator/zkmpvehya3When I wanted to smoothly fade between all the available RGB colors, I couldn’t find a good solution. So I made my own using Gaussian curves. Here is a picture and link to the online graphic calculator desmos that was very helpful visualizing the LED levels.
There is more:
Continue reading “1 Pixel video game; component-driven design”

FOSSCON 2013

FOSSCON is right around the corner, and Hive76 is gearing up for another run. Our very own Jordan Miller is presenting the keynote talk on building Open Source Infrastructures for Science. We’ll be in our own room again this year showing off our latest gadgets and creations, our tools and our know-how.You can expect to see a 3D printer in action, Circuit Bending, Piezo madness, Battlebots and more. We’ll be there August 10th, 9AM-5:30PM.

Consider registering and getting a FOSSCON T-Shirt and helping us come back next year! As always, feel free to come and ask us questions via WordPress, Twitter, E-mail, or IRC.

Delaware RepRap Prusa i3 Mendel Build Class

Our friend John Abella (of the Maker Faire 3D Printer Village and Delaware Makerspace Barrel of Makers) is running a two-day RepRap build workshop in Wilmington Delaware, October 5th and 6th.   Attendees will be building Prusa i3 printers with all top-shelf parts:  milled frames from Josef Prusa, genuine J-head hotends from Hotends.com, stainless threaded rods and hardened chromed smooth rods.

The workshop is being held at the Wilmington DoubleTree Hotel, and will have catered food for attendees.   Every person attending will leave with tools and basic supplies to maintain their printer and get started printing.   The workshop fee – all inclusive –  is $999.

Click here for the official flyer for the event

More info and class registration can be found here:  http://botbuilder.net/classes/

New Hydroponics Set Up!

I finally finished the hydroponic garden I’ve been building at Hive76 for the past few months.   The plants have just started to sprout, so it will be at least another month before they can be harvested.  But when they are ready, if you want to take some cuttings for yourself at open house you’re more than welcome to.  Right now I am growing basil, thyme, oregano and morning glories.

Unfortunately, I’m spending the rest of the summer in Germany so I won’t be at open house to answer any questions in person, but I will be back in September. In the mean time I’ll start posting the blueprints of the hydrogarden, so anyone will be able to build one if they want.  Hope to have more of the details next week!

Thanks, to Pete for agreeing to watch my plants while I’m gone, Rob for letting me steal his wood and carpentry techniques to build the frame, and Jordan for helping to design the caster flat bed and general support!